How to make an astrometry file
Note
This page refers to How to make a catalog for astrometry.net in HSC pipeline Binary Distribution page. You can also refer Building Index Files for Astrometry.net.
Warning
We assume a registration of setup-hscpipe before you make an astrometry file. If you did not register, please setup a command first with setup-hscpipe.
The absolute coordinate of observed sky is determined using Astrometry.net in HSC pipeline. Thus, you should prepare an astrometry file (so called an index file) which can be read by Astrometry.net. In this page, we describe how to make an index file step by step as following:
- Preparing a catalog file
- Converting .csv file to FITS BinTable
- Cutting FITS BinTable with respect to each observing sky
- Creating index files that astrometry.net uses
- Converting your own astrometry catalog directory to UPS directory style
- Installing and setup for your own astrometry catalog directory
- Installing and setup for your own astrometry catalog directory on hanaco
Preparing a catalog file
First step is to prepare a catalog file for astrometry. Although there may be several way to prepare it, here we introduce the way by using ds9. If you have not installed ds9 in your machine, you can obtain it from here.
Open ds9, and select Analysis > Catalogs in menu-bar. Then, you can confirm several catalogs in different wavelengths. Because HSC is optical photometric camera, it is better to choose a catalog from Optical. In Optical, there are catalogs named GSC, SDSS, Tycho and so on. In this instruction, we select USNO-A2.0.
Warning
We recommend you to select a catalog file whose filter’s wave-length coverage is about the same as your observed filter, since an astrometry file is used not only for astrometry, but also for determining zero magnitude. Although you can match WCS with HSC pipeline, you need to determine zero magnitude by yourself in the absence of a catalog with a proper filter.
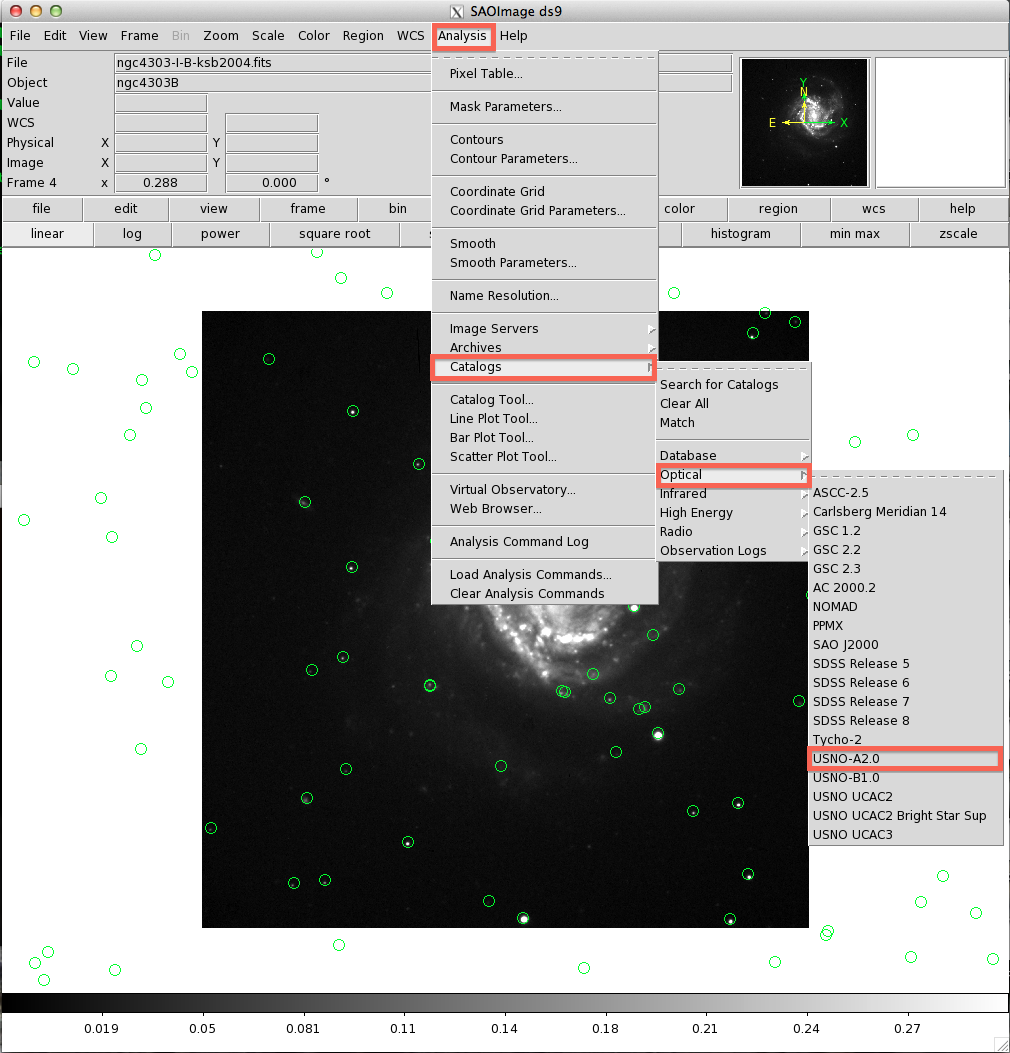
Fig 1: Selecting a catalog by ds9.
Once you select a catalog, you can find a listing of objects in a different ds9 window. If you open a image fits of your target, objects within the fits image are shown in the window (see Figure 1). If not, any objects are not shown.
Next is to display all objects within a sky where you want to make a catalog file, by setting central coordinate of your observing sky in α, δ and the sky size in Object within the top red framework of Figure 2. We recommend you to set a larger sky size in consideration of mosaicing and dithering. After setting your sky information, push Retrieve button (the bottom red framework of Figure 2) and retrive a listing.
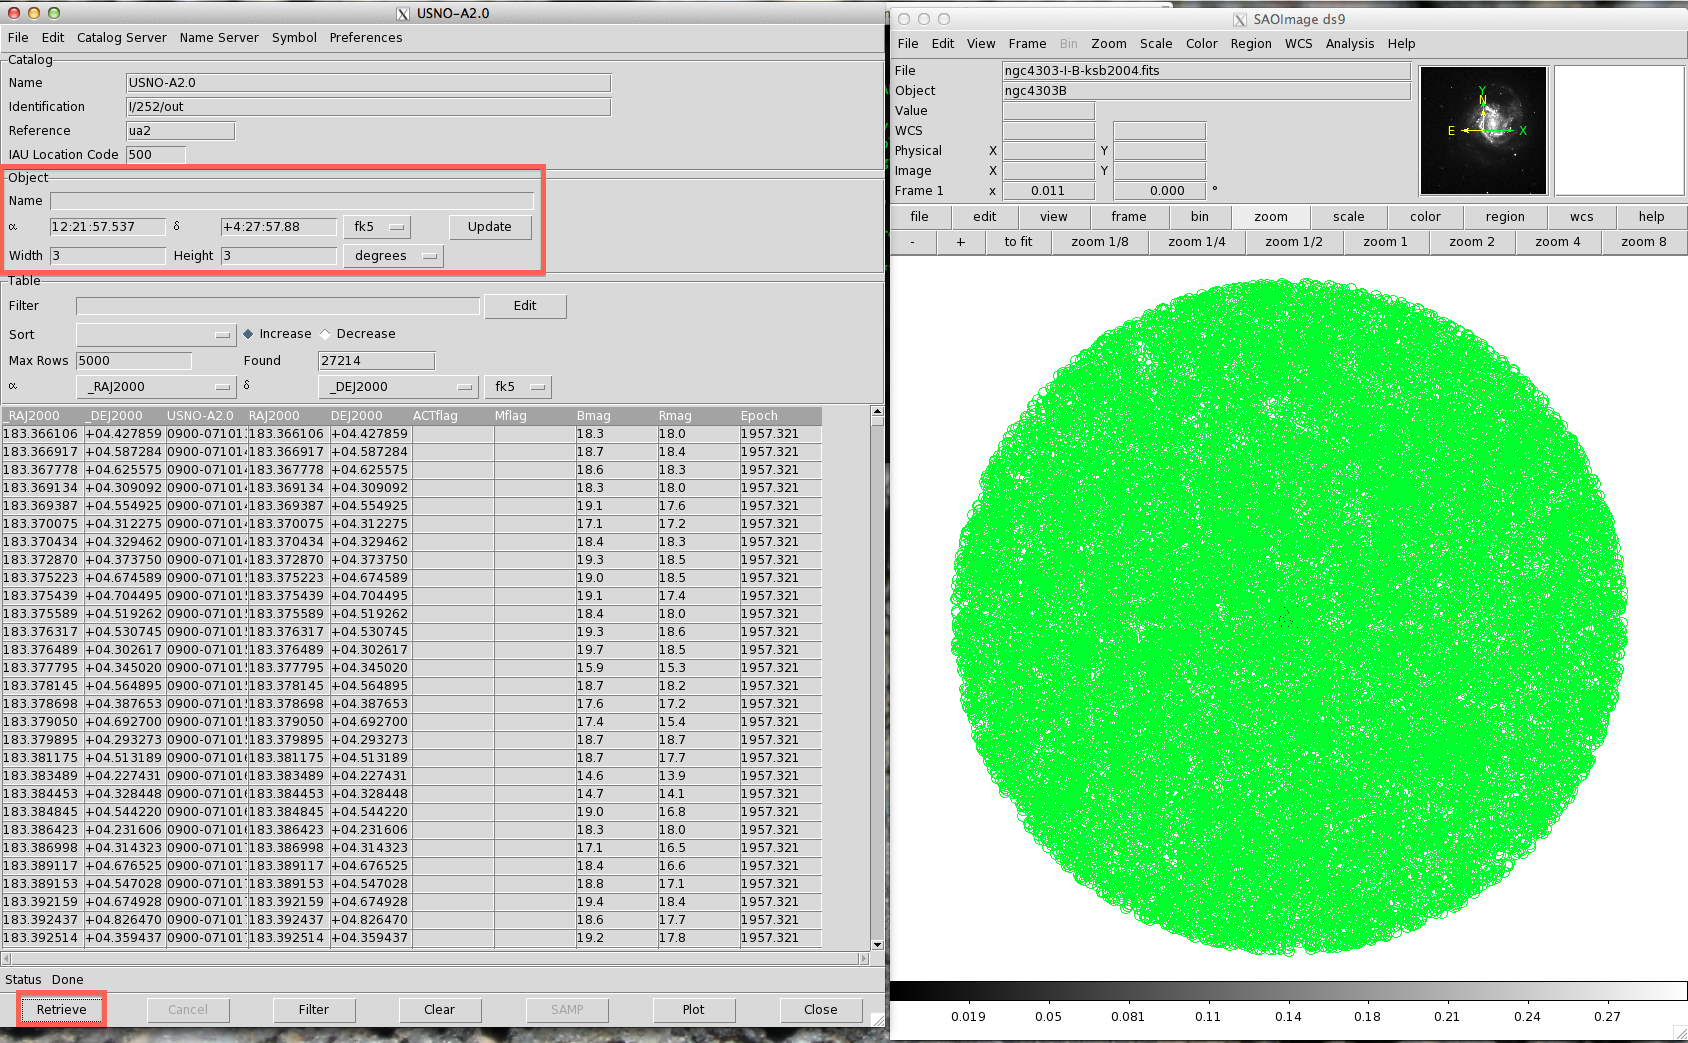
Fig 2: Obtaining a listing of objects within your observing sky.
Save your listing of objects in a different ds9 window to a file by selecting
File > Save ... in a menu-bar (Figure 3). You can add any extension
to the file. Default is .xml.
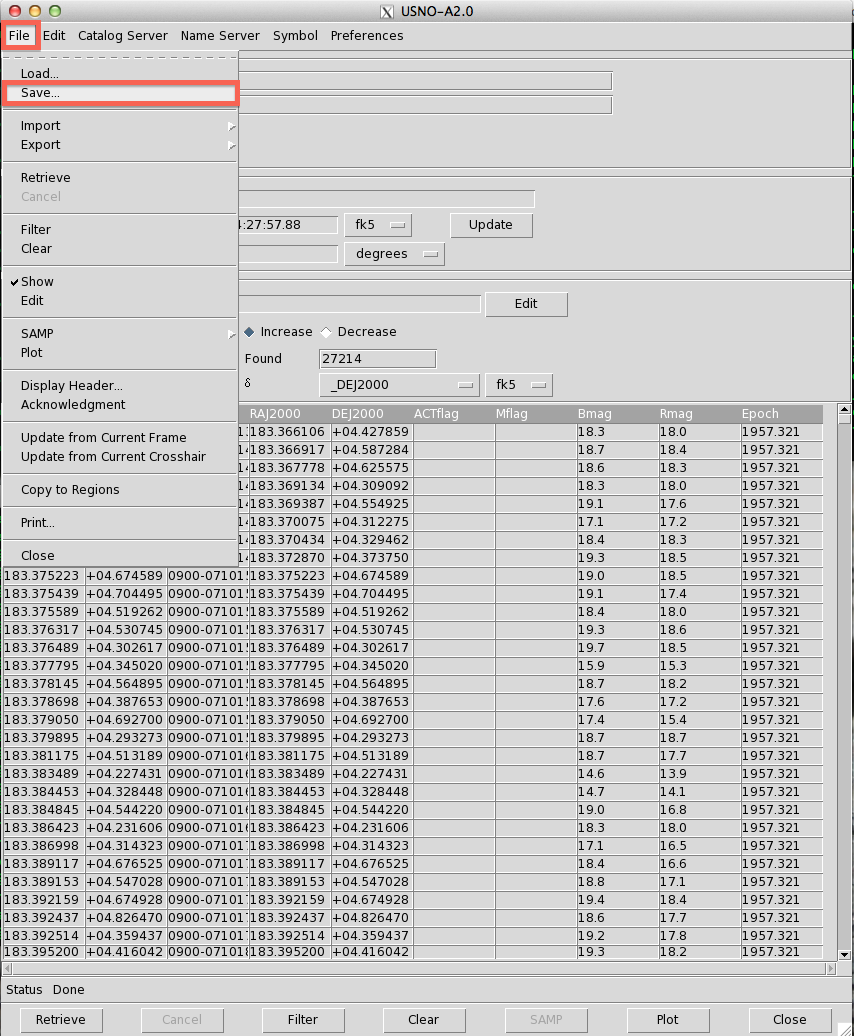
Fig 3: Saving a listing of objects to a file.
You extract object IDs, RA, DEC, magnitudes from the .xml file,
and convert it to .csv file. Finally you need to make a following catalog file.
Warning
In case you use this catalog file in pipeline, you need to specify the filter names in lower-case letters (e.g., g, r, i, z, y,...). Otherwise astrometry can fail.
id,ra,dec,ra_err,dec_err,starnotgal,r,u,g,i,z,r_err,u_err,g_err,i_err,z_err
1237645879551066262,348.90252656,1.27188781,0.01384772,0.01628234,0,19.410612,18.237537,17.581324,17.201529,16.901588,0.046767,8.25278E-3,7.026487E-3,8.094831E-3,0.021641
1237645879562862699,15.89612394,1.26484677,0.01108913,7.81238953E-3,0,20.149837,19.282238,19.031107,18.95554,18.782871,0.046607,0.011408,0.012107,0.017041,0.054156
 :
 :
(From SDSS DR8)

# column alias
#
# id                    : Object ID
# ra                    : ra [degree]
# dec                   : dec [degree]
# ra_err                : ra error
# dec_err               : dec error
# starnotgal            : 1 for stars / 0 for the rest
# r, u, ...             : magnitudes of a filter
# r_err, u_err, ...     : magnitudes error of a filter
A catalog file made by ds9 includes descriptions about the catalog (e.g. USNO-A2.0), sky information (the outside of a red square in Figure 4), and objects information (the inside of a red square in Figure 4). You must extract necessary information (the inside of a red square in Figure 4) from the catalog file and make your own catalog file. This is an example:
# Oepn an editor soft and remove the header
# Replace unnecessary string in each raw
emacs ds9.xml

#(You can obtain a following ds9.xml file)
# ra, dec, object IDs, ra, dec, b-band magnitudes, r-band magnitudes, epoch from left to right
        183.366106 +04.427859 0900-07101388 183.366106 +04.427859   18.3 18.0 1957.321
        183.366917 +04.587284 0900-07101405 183.366917 +04.587284   18.7 18.4 1957.321
        183.367778 +04.625575 0900-07101414 183.367778 +04.625575   18.6 18.3 1957.321

# Extract necessary information from ds9.xml and make `.csv` file
# For simplicity, we assume that all objects in ds9.xml are stars (i.e. starnotgal = 1)
#    ra_err = 0
#   dec_err = 0
#     b_err = 0
#     r_err = 0
awk '{print $3,$4,$5,0,0,1,$6,$7,0,0}' ds9.xml > test.csv

# Oepn an editor soft and add header in `.csv` file
emacs test.csv

        id,ra,dec,ra_err,dec_err,starnotgal,b,r,b_err,r_err
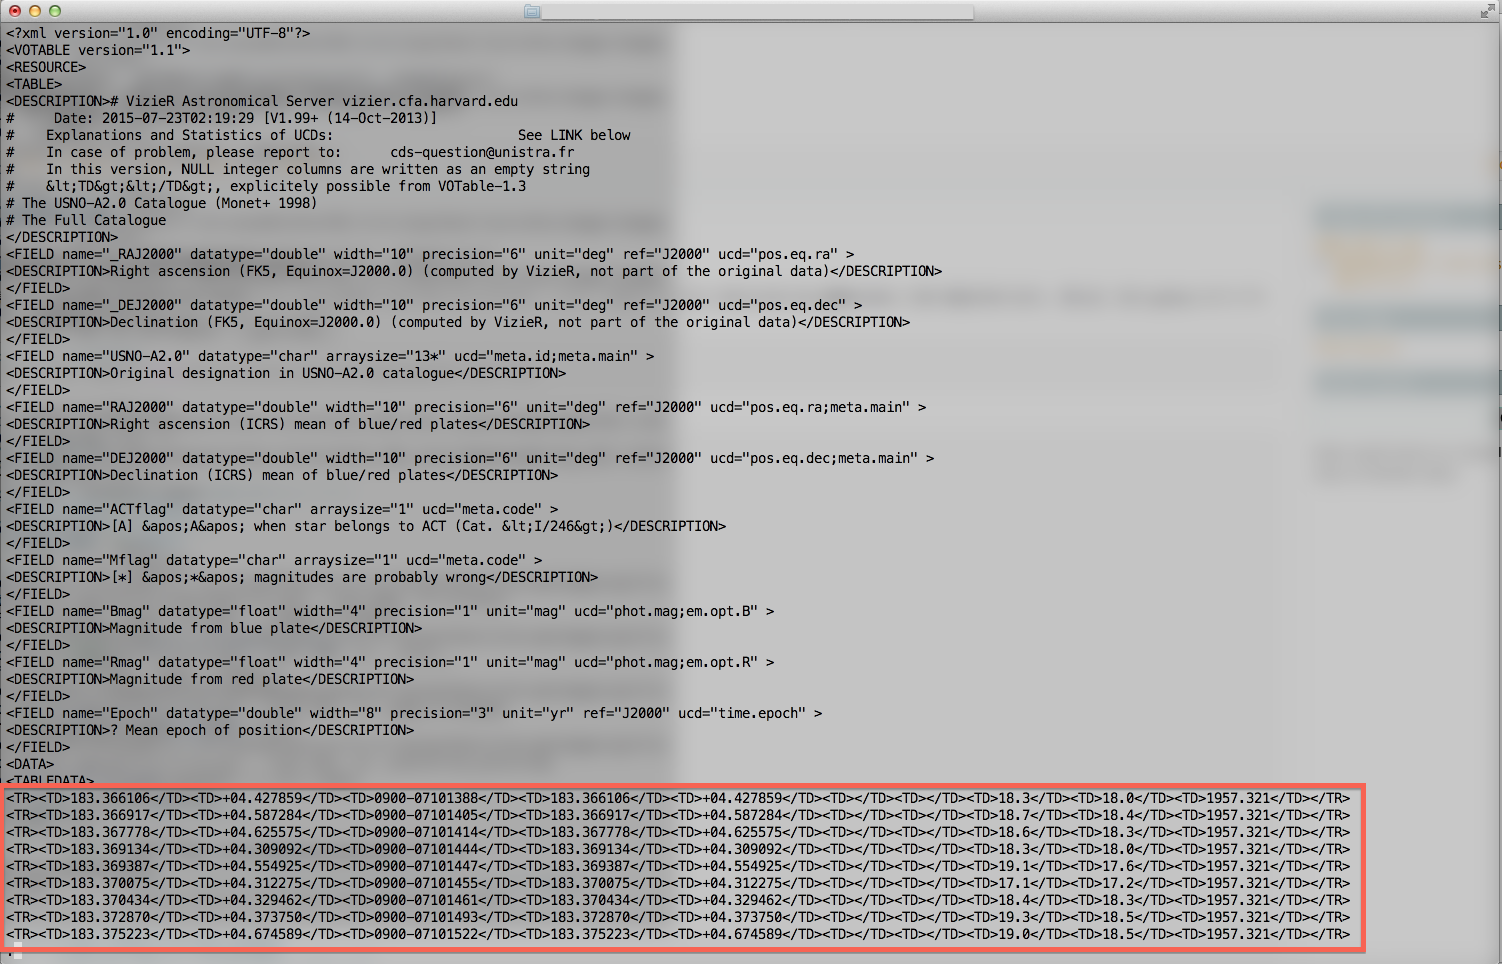
Fig 4: Contents of ds9.xml
Converting .csv file to FITS BinTable
The second step is to convert .csv file to FITS BinTable. You can perform it
with csv-to-fits.py.
# Convert test.csv to FITS BinTable
#
# USAGE: python csv-to-fits.py <input `.csv`> <output `.fits`>
python csv-to-fits.py test.csv test.fits
Warning
Sometimes test.csv includes characters other than “NaN” or “inf” (A, * etc...). The csv-to-fits.py can fail to execute because of the presence of these characters. Thus, you must check the presence of characters other than NaN or inf in test.csv, and remove lines which include them before you run csv-to-fits.py.
Cutting FITS BinTable with respect to each observing sky
The third step is to cut your observing sky in such a way as to cover the same surface area. It is done with respect to each pixel of Healpix (Hierarchical Equal Area isoLatitude Pixelization). In the following example, we make a work directory, and cut FITS BinTable in there.
# Make a work directory
mkdir workdir

# Cut observing sky with respect to each pixel of Healpix
#
# USAGE: hpsplit -o <output catalog name> -r <alias for RA(ex: ra)> -d <alias for DEC(ex: dec)> -m <margin around Healpix [degree]> <input FITS BinTable> -n <number of Healpix>
#
# Parameters
#       -o              : Output catalog name
#       -r -d   : Aliases of RA, DEC raw
#       -m 1    : Margin around Healpix [degree]. Default is 0
#       -n 2    : Number of Healpix
hpsplit -o workdir/cat-%i.fits -r ra -d dec -m 1 test.fits -n 2
Creating index files that astrometry.net uses
The fourth step is to create index files from catalog files made in the third step. You can create index files as follows:
Warning
The astrometry file is also used for determining zero-point magnitude in mosaic.py. We recommend you to specify a filter whose wavelength range is close to the one used in your HSC observations as the default filter.
# Specify the default filter
filter=r

# Make output directory for index files
mkdir output

# Create index files from FITS BinTable under workdir directory
find workdir -name "cat-*.fits" -print0 | while read -r -d '' catalog
do
        # Generate index="output/index-*.fits" from catalog="workdir/cat-*.fits"
        index="${catalog/"workdir/cat-"/output/index-}"

        # Trim the extension ".fits" from index="output/index-*.fits"
        index="${index%.*}"

        # Build preset 0
        #
        # USAGE: build-astrometry-index -i <input FITS BinTable> -o <output index file> -P <scale number> -S <sort column by a number specified here> -n <number of stars per fine Healpix grid cell> -r <deduplication radius in arcseconds> -j <positional error of stars in arcseconds> -E
        #
        # Parameter description
        #       -v      : Verbosity
        #       -i      : Input FITS BinTable
        #       -o      : Name of output index file
        #       -P      : Scale number.
        #       -S      : Specify a column when astrometry.net sorts columns. You can skip this parameter, if you sort catalog file in order of the default filter.
        #       -n      : Number of stars per fine healpix grid cell
        #       -r      : Deduplication radius in arcseconds. No deduplication is done in a default setting.
        #       -j      : Positional error of stars in the reference catalog [arcsec]. The default value is 1 arcsec.
        #       -E      : Scan through the catalog, checking which healpixes are occupied
        build-astrometry-index -v -i $catalog -o $index-0.fits -P 0 -S $filter -n 100 -r 1 -j 0.4 -E

        # preset 1, 2, 3
        # you need to change p value depending on your reduction
        for p in {1..3}
        do
                build-astrometry-index -v -1 $index-0.fits -o $index-$p.fits -P $p -S $filter -n 100 -r 1 -j 0.4 -E
        done
done
A directory which index filies are created is your own astrometry catalog directory (output directory is the one in this document). Once you confirm index files under an output directory, you need to create a config file in the directory. Scheme of index files is described in this config file.
emacs output/andConfig.py
Here is descriptions in a config file.
import os.path
import os
import glob

root.starGalaxyColumn = "starnotgal"
filters = ("b", "r")            # Enumerate the filters in the catalog you prepared
root.defaultMagColumn = "r"     # Default filter
root.magColumnMap = dict([(f,f) for f in filters])
root.magErrorColumnMap = dict([(f, f + "_err") for f in filters])
root.indexFiles = [os.path.basename(path) for path in glob.glob(os.path.join(os.environ["ASTROMETRY_NET_DATA_DIR"], "index-*.fits"))]
Converting your own astrometry catalog directory to UPS directory style
The next step is to convert your own astrometry catalog directory to UPS directory, since EUPS requires.
mkdir -p output/ups
touch output/ups/astrometry_net_data.table
Installing and setup for your own astrometry catalog directory
The final step is to install your own astrometry catalog into your machine. Rename your own astrometry catalog directory an approptiate name, and move it an appropriate directory.
# Rename `output` directory `test_catalog`
mv output testcatalog

# Move `testcatalog` into a directory for astrometry catalog
mv testcatalog ~/pipe/hscpipe/astrometry_net_data/
The name of testcatalog should start as follows;
- sdss* : If you extract the catalog from SDSS, put “sdss” at the head of the directory name.
- ps1* : If you extract the catalog from Pan-STARRS, put “ps1” at the the head of the directory name.
- hsc* : If the catalog is from HSC itself, put “hsc” at the head of the directory name. It is also used when you do not want color correction.
If you need to create the catalog for narrow-band filters annotated in HSC pipeline filter list , you have to put hsc at the head of the directory name.
You register your own astrometry catalog in EUPS.
Warning
If you use HSC data analysis machine for open use(hanaco), you will fail to register with this way. So please refer to Installing and setup for your own astrometry catalog directory on hanaco.
# Register your own astrometry catalog in EUPS
#
# USAGE: eups declare -m <your own astrometry catalog> -r <your own astrometry catalog directory> <package name(ex astrometry_net_data)> <version(ex test_catalog)>
eups declare -m ~/pipe/hscpipe/astrometry_net_data/test_catalog/ups/astrometry_net_data.table -r ~/pipe/hscpipe/astrometry_net_data/test_catalog/ astrometry_net_data testcatalog
Finally, you need to setup your own astrometry catalog.
# Setup your own astrometry catalog
setup astrometry_net_data testcatalog
Installing and setup for your own astrometry catalog directory on hanaco
If you want to setup your own astrometry catalog on hanaco, please follow the way shown below.
# Specify your own EUPS repository (Anywhere is fine.)
myeups=/data/<user name>/eups-4.0.1

# Create EUPS repository
mkdir -p $myeups/ups_db

# Define new EUPS_PATH
export EUPS_PATH=$myeups:$EUPS_PATH

# Declare youw own catalog
eups declare -m /data/<user name>/astrometry_net_data/test_catalog/ups/astrometry_net_data.table -r /data/<user name>/astrometry_net_data/testcatalog astrometry_net_data testcatalog
# If there is an error after declaration, please try again with the option --nolocks.
You can set the setup command for your own catalog.
# Add below in your .bashrc file
setup-myhscpipe()
{
   setup-hscpipe &&
        export EUPS_PATH=/data/<user name>/eups-4.0.1:$EUPS_PATH
}
After that, you can use setup-myhscpipe to setup your astrometry catalog.